 Bolt Hole Circle command
 Bolt Hole Circle command
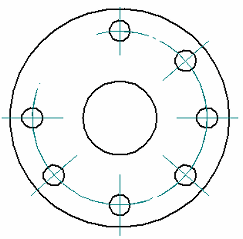
Places a bolt hole circle annotation, which is made up of a series of arcs with radial center marks.

The Bolt Hole Circle command bar specifies the method for creating the bolt hole circle annotation. You can define it using two points, three points, or a center point and radius.
You also can open the Bolt Hole Circle Properties dialog box to specify the types of elements (circles, arcs, hidden lines) that you want to apply center marks to in the bolt hole circle annotation. For example, you can use the Arc option to ensure that bolt hole circles that are split by other features are included in the bolt hole circle, and that center marks are placed on them.
You can select an existing bolt hole circle, and then use the Add/Remove Element option on the Bolt Hole Circle command bar to add missing center marks to, or remove unwanted center marks from, elements in the bolt hole circle annotation.
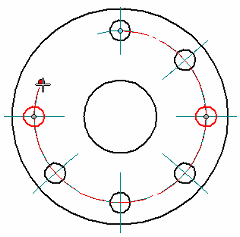
When you place a bolt hole circle, you can select the Trim option on the command bar to define a bolt hole circle that is less than 360 degrees. This option alters the bolt hole circle creation workflow so that you are prompted to click the portions of the bolt hole circle that you want to trim away. The arc segment that is nearest your cursor is the portion that is removed.

After trimming, you can do either of the following to modify a partial bolt hole circle:
You can drag the round edit handles to adjust the length of the trimmed circle. The edit handles appear as solid dots at both ends of the circle segment.

You can restore the full bolt hole circle by selecting the partial circle segment and then deselecting the Trim button on the Edit Definition command bar.
You can select the Properties button on the command bar to modify the formatting of the bolt hole circle annotation. In the Bolt Hole Circle Properties dialog box, you can change:
Bolt hole circle color
Line type and width
Center mark size