Engineering calculation tools are available in the 3D environments and while drawing 2D geometry in profiles, sketches, and in the Draft environment. These tools are located on the various groups in the Inspect tab.
You can:
Measure distance, area, and length using the Measure commands.
Compute area, perimeter, centroid, and moments of inertia for one or more closed regions using the Area command.
Create a persistent area object with its own set of variables using the Area command.
Resolve what-if questions in 2D drawings, profiles, and design sketches using the Goal Seek command.
Automate engineering calculations based on dimensioned geometry to achieve a specific design goal using the Goal Seek command.
Reference 3D design variables in the Variable Table using the Variable Name property text string. Size values, for example, can be extracted into 2D dimensions in a sketch.
You can measure distances or areas even when you are in the middle of another task. To learn how, see these sections within the Help topic, Distance and Area Measurement:
Measure linear distance in 2D drawings, sketches, and profiles
Measure distance and angles on a 3D part, sheet metal, or assembly
Perimeter, as well as area, is measured by the Inspect→Area command.
To set the units for measuring distances and areas, use the File→File Properties command, and then set the options on the Units page of the File Properties dialog box.
On the Inspect menu, both the Measure Area command and the Area command calculate the area inside one or more closed boundaries, but the Area command does much more.
If you select the Create Area option on the Area command bar before you compute the area, the filled area becomes an object that is associative to the boundary used to define it. The quantitative information is retained and can be reviewed on the Area Properties page of the Info dialog box. You can manipulate this area object and it will update the area and other calculations.
Use the Area command if you want to:
Calculate additional quantitative information about the region, such as perimeter and moments of inertia.
Display centroid (X,Y) and principal moments of inertia (PX,PY) coordinate systems for the area.
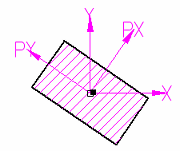
Use the handle point generated for the region included in the area object to select and drag the area fill into another closed boundary.
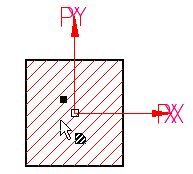
Select automatically generated area object properties for perimeter or area as the dependent variable whose value you want to calculate in goal seeking calculations.
Reuse the area object and its information in further calculations or in other processes. For example, you can dimension to the keypoint at the origin of the area coordinate system located at the centroid of the area object.

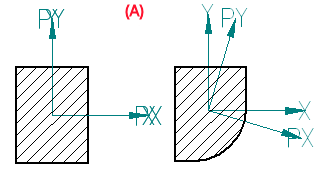
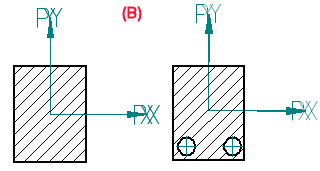
Calculate the discrete area of overlapping elements, and then add or remove geometry and recalculate, as illustrated by examples (A) and (B).
To distinguish area objects from other 2D elements, you can set different display properties for them using options on the Area command bar and the Info dialog box.
Coordinate system axes
Independent controls for the centroid coordinate system and the principal moments of inertia coordinate system are available on the Coordinate Systems page of the Info dialog box. You can turn the coordinate systems on and off and change the display colors and characteristics of the leaders and text.
Even when the coordinate system axes are turned off, you can still see and select the center-of-area keypoint located at the centroid of the area object. You can use this keypoint to connect other objects to it, such as dimensions.
The overall size of the coordinate system is controlled by the font size in the dimension style.
Area fill color and pattern
Prior to creating an area object, you can select a fill style from the Fill Style list on the Area command bar.
You also can make independent changes to the line, color, and pattern used to fill an area object using the options on the Fill page of the Info dialog box.
After you have created an area object, you can select an area and modify its fill and coordinate system properties by selecting the Properties button on the Area command bar or by choosing Properties from the area object shortcut menu.
The Goal Seek command automates engineering calculations to achieve a specific design goal. These can be based on dimensioned geometry. For example, you can use the Goal Seek command to find the appropriate dimensions given a desired target area value.
Goal seeking finds a specific value for a dependent variable (dependent by formula, for example) by adjusting the value of another variable, until it returns the result you want. Goal seeking shows you the effect on the geometry and it also updates the Variable Table with the new value.
The Goal Seek command operates on driven and driving formulas, variables, and dimensions attached to 2D geometry. The type of dimension you add—driving or driven—determines what you can solve for.
Driving variables and dimensions, which are independent, can only be used for the Variable to be changed. Driven variables and dimensions, which are dependent, can only be used for the Goal. For example, when you create an area object, you generate driven variables for perimeter, area, and moments of inertia in the Variable Table. These can be selected as the Goal. The Variable should be related to the Goal so that when a change is made to the Variable, it causes the Goal to change through a formulaic or geometric relationship. For more information, see the Best Practices in Goal Seeking section in the Engineering Calculation Tools Help topic.
When you are ready to run goal seeking, use the options on the Goal Seek command bar to:
Select the dependent Goal that you want to calculate or modify.
Set a Target value you want to achieve.
Select the Variable that you want to change.
Select the check mark to begin the calculation.
The dimensioned geometry updates to show the results of the calculation.
You can change the Goal, the Target, and the Variable to achieve different goals.
Many calculations based on geometry can be solved in more than one way. You can extend the length of time the goal seeking operation runs by editing the limits set on the Goal Seek Options dialog box. For more information, see the Controlling Goal Seeking Attempts section in the Engineering Calculation Tools Help topic.
A tutorial is available to assist you in learning how to use the goal seeking workflow. To access this tutorial, choose Help→Solid Edge Tutorials, and then look in the Draft Tutorials section.
System-generated variables, user-defined variables, and values are maintained in the Variable Table. The Variable Table defines functional relationships between the variables and dimensions of a design. When you create an area object with the Area command, a corresponding set of variables and current values are generated automatically in the Variable Table. Similarly, when you place a driving dimension on a sketch or profile element, a dimension variable and value are generated.
Dimensions and area objects that you add to the 2D and 3D geometry are also added automatically to the Variable Table.
When you add a dimension, you can choose the type of dimension you add—driving or driven—determines what you can solve for.
All area object variables for area, perimeter, and coordinate systems are driven (dependent) variables.
You can type formulas directly in the Variable Table to reference any dimensional and area object variables and values.
As you add dimensions to your drawing, you may want to work with the Variable Table open. This way, you can change each system-generated variable name to a more logical name as you work. When you rename variables, the variable name must begin with a letter, and it should contain only letters, numbers, and the underscore character. Do not use punctuation characters.
You can show variables and values in your 2D design using annotations that reference the Variable Table through property text. In this example, property text in callouts reference weight and force values calculated for the crane, crate, and force.
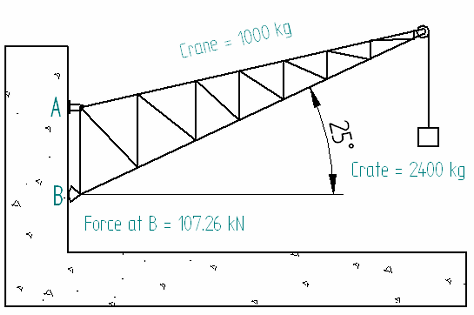
To extract property text from the Variable Table into an annotation, in the Select Property Text dialog box, choose Variables From Active Document as the property text source. To learn how to do this, see the Help topic, Extract Variable Table data using property text.
You can open and review the Variable Table contents by selecting the Tools→Variables command.
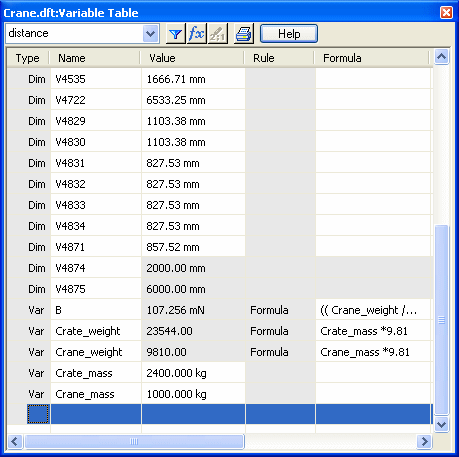
When reviewing or editing variable names and values through the Variable Table, you may need to know which variable name is associated with which dimension in the design. This is true especially when you are editing a design you are not familiar with, or if the 2D geometry and dimensions are placed on many different layers.
With the Variable Table open, you can click a cell labeled Dim in the Type column, and then look in the graphics window for the highlighted dimension.
There are several things you can do to ensure the goal seeking operation succeeds.
Add geometric relationships—As you draw, IntelliSketch adds geometric relationships automatically. You also can use the Relationship Assistant command to add geometric relationships to profiles so that the geometry is fully constrained. Fully constrained geometry ensures more predictable results.
The Relationship Assistant is particularly useful when working with geometry that you import from other systems.
Add driven variables and dimensions (for the Goal)—For a variable value that you want to be able to modify or calculate, add a driven dimension, or create an area object, or define a formula using driven variables. The value of a driven variable or dimension is controlled by the element it refers to, or by a formula or variable you define.
Add driving variables and dimensions (for the Variable)—For a value that you want to allow to change, add a driving dimension or variable. The value of a driving variable or dimension controls the size, orientation, or location of an element. Changing this variable must cause the Goal to change, too.
Note:
Driving variables, which are independent, can only be used for the Variable to be changed.
Driven variables, which are dependent, can only be used for the Goal.
The Variable should be related to the Goal, so that when a change is made to the Variable, it causes the Goal to change through a formula or geometric relationship.
To learn about the different types of dimensions, how to recognize them, and how they can be used to control the design, see the Help topic, Dimensioning elements overview.
Set up the problem—Sometimes, if the initial conditions set on the command bar are too widespread, goal seeking will not find the target value or it may require too many iterations. If you start the goal seeking operation with the value of the Variable set such that the Goal is close to the Target, the iterative process generally will be faster and more successful.
Set numerical limits—You can use the Variable Rule Editor dialog box, available within the Variable Table, to set upper and lower limits on the domain of possible values that can be used for the Variable. You can define a discrete set of values, or a range of values, for a variable. This allows you to restrict design changes to a controlled set of values.
Example:
Example 1—If you are seeking a value for the diameter of a circle or the length of a line, you should set a limit that their value be greater than 0.
Example 2—If you are seeking the diameter of a pipe, then you should set a limit that the outer diameter is greater than the inner diameter.
Example 3—If you are seeking an angle, then you should define a rule that limits the possible solutions to an acceptable range, such as between 5° and 90°, or between 90° and 180°.
To learn how to set limits on variables, see the Help topic, Define limits for a variable.
The Goal Seek command is an equation-solving algorithm that works through an iterative process to find the target value for a goal. Numerical solution techniques such as these can fail to solve the equation or produce numerical instabilities. The Maximum Time and Maximum Number Of Iterations set in the Goal Seek Options dialog box limit the amount of time that goal seeking will run should it fail to find a solution.
When an equation fails to produce a solution, it may be due to any of these factors:
There may not be a solution for a given set of inputs.
The maximum number of iterations was reached before a solution was found.
The maximum time limit was reached before a solution was found.
You can adjust the maximum time or maximum number of iterations to suit the needs of the particular situation you have. Select Goal Seek Options on the Goal Seek command bar to open the Goal Seek Options dialog box.